- 833-766-6427
- 833-847-2009
User guide
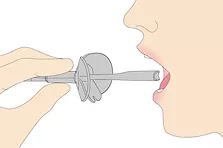
Step 1: Holding the oral interface, gently squeeze the lip shield and place in mouth
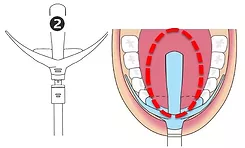
Step 2: Position tube toward upper palate
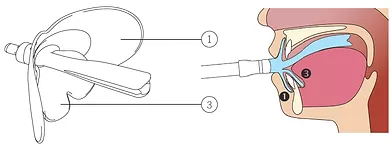
Step 3: Place silicone shields between front teeth and lips
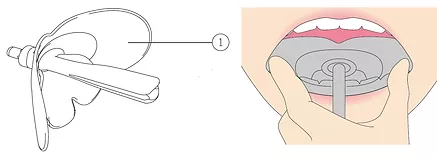
Step 4: Adjust lip shields for comfort
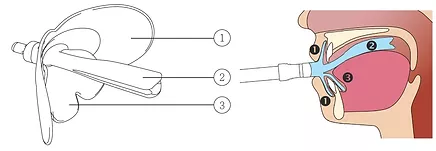
Step 5: Swallow Swallow a few times to create suction and establish a sealed oral cavity.
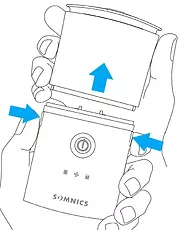
Step 1: Press the ejection buttons on both sides of the console to disconnect the saliva container. Both ends of the container should disengage before separating from the console.
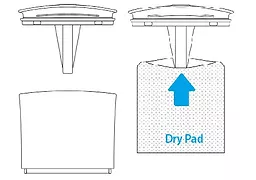
Step 2: Open the container and place a new dry pad in the container with the lid’s pointed end inserted into the pad.
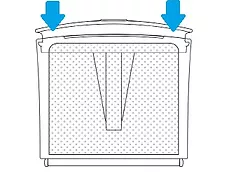
Step 3: Reattach the saliva container lid to the console, ensuring that you hear it “click” into place.
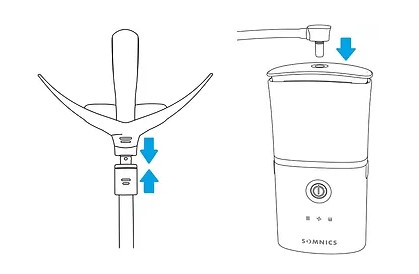
Step 4: Connect the oral interface with the white end of the tube and be sure it is securely attached. Attach the grey end to the top of the saliva container so that you hear it “click”.
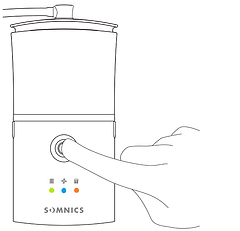
Step 5: To turn on the iNAP, press and hold the power button for 2-3 seconds (The existing content in the paragraph is fine)
As the device activates, you will see three lights flash for a few seconds- Green=on, Blue*=attaining vacuum, Orange=container is full, or sensor detects higher pressure in the oral cavity *Note- the blue light will turn off when the sensor detects that a seal has been created in the mouth.Practice positioning the oral interface in your mouth, and with the device turned on, it will take approximately 15 seconds to achieve negative pressure in your oral cavity. Here are some tips to help you:
With the oral interface in position, bring your tongue to the bottom of your mouth. As you begin to feel the negative pressure in your throat, slowly allow your tongue to rise and position itself under the straw”.
To improve Sealing:
Swallowing can help maintain the seal during the night. Making the humming sound can help.
In the first month, the seal percentage average is 60% – 70%. While continuing to acclimate during months 2-3, this percentage is likely to improve to 85%-99%.
Note: individuals may experience different results based on their OSA severity and oral anatomy.
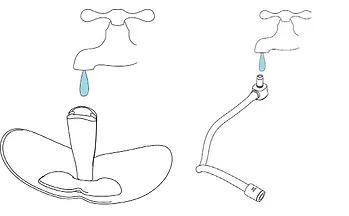
1. Connect the oral interface, tubing, container, and the iNAP console.2. Prepare a cup with 8 oz of lukewarm water. note: DO NOT use hot water higher than 40 °C/ 104 °F.
3. Place the oral interface inside the cup.
4. Drop a Potassium-peroxymonosulfate-based cleaning tablet into water and ensure the cleaning tablet begins to dissolve.
5. Set timer for 15 minutes to disinfect the oral interface. note: DO NOT soak your oral interface, tubing, and saliva container in the cleaning solution overnight. Prolonged immersion might cause damage to the filter.
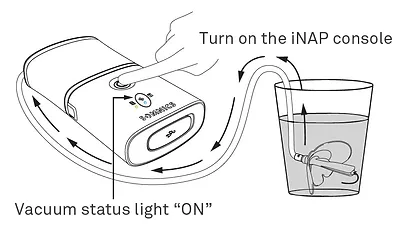
6.Lay the iNAP console down on the counter. Be sure that the lid is on tight and turn the iNAP on. The battery power light will be solid green, and the vacuum status light will be flash blue. The negative pressure will draw the cleaning solution into tubing and saliva container.
7. When the container is full, the orange light will be solid, and the vacuum status light will become dim. Turn off the iNAP console, wait 15 minutes to disinfect the saliva container, oral interface, and tubing.
8. Remove all the cleaning solution and clean the oral interface, tubing, and container with running water.
9. Let the components air dry. Note: If you feel the smell of the cleaning tablet particles on the oral interface, soak the oral interface in warm water for 10 minutes before using.
3. Place the oral interface inside the cup.
4. Drop a Potassium-peroxymonosulfate-based cleaning tablet into water and ensure the cleaning tablet begins to dissolve.
5. Set timer for 15 minutes to disinfect the oral interface. note: DO NOT soak your oral interface, tubing, and saliva container in the cleaning solution overnight. Prolonged immersion might cause damage to the filter.
6.Lay the iNAP console down on the counter. Be sure that the lid is on tight and turn the iNAP on. The battery power light will be solid green, and the vacuum status light will be flash blue. The negative pressure will draw the cleaning solution into tubing and saliva container.
7. When the container is full, the orange light will be solid, and the vacuum status light will become dim. Turn off the iNAP console, wait 15 minutes to disinfect the saliva container, oral interface, and tubing.
8. Remove all the cleaning solution and clean the oral interface, tubing, and container with running water.
9. Let the components air dry. Note: If you feel the smell of the cleaning tablet particles on the oral interface, soak the oral interface in warm water for 10 minutes before using.
- Download the iNAP Lab+ app from the Apple Store or Google Play.
- You will be able to see your total treatment time and sealing percentage by Day/Week/Month.
- Sealing percentage is an index of vacuum status. For example, 70% sealing means you have 70% of your total treatment under vacuum, and 30% of the time, the pump was working on moving your tongue forward in order to create vacuum status.
- Download user manual.